Tool Design Cutting
03:28Tool DesignCutting Tool Design
Nageswara Rao
Posinasetti
January 31, 2008 Nageswara Rao Posinasetti 2
Guidelines for Cutting tool Design
Rigidity
Strength
Weak links
Force limitations
Speed, feed and size
Related force components
Chip disposal
Uneven motions
Chatter
January 31, 2008 Nageswara Rao Posinasetti 3
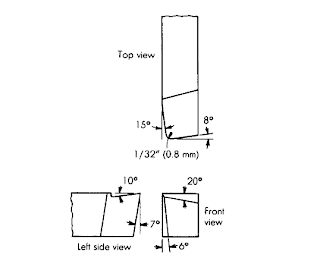
Basic tool angles (Tool Signature)
Back rake angle
Side rake angle
End relief angle
Side relief angle
Selecting carbide Tools
Establish the operating conditions
Select the
–Cemented carbide grade
–Nose radius
–Insert shape
–Insert size
–Insert thickness
–Tool style
–Rake angle
–Shank size
–Chip breaker
Establish the operating
conditions
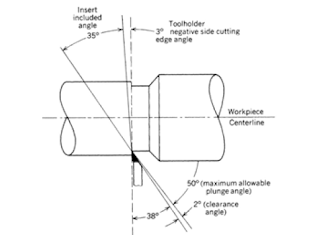
Feed, speed and depth of cut greatly
influence the machining performance.
Also lead angle affects the
performance
FIGURE F-27 The difference in style A and style D holders for
depth of cut and cutting edge engagement length (copyright ©
General Electric Company).
Richard R. Kibbe, John E. Neely,
Roland O. Meyer, and Warren T.
White
Machine Tool Practices, 7e
Copyright ©2002 by Pearson Education, Inc.
Upper Saddle River, New Jersey 07458
All rights reserved.
5
January 31, 2008 Nageswara Rao Posinasetti 13
FIGURE F-28 Large, well-formed chips were produced by this
tool with built-in chip breaker (Kennametal, Inc., Latrobe, PA).
Richard R. Kibbe, John E. Neely,
Roland O. Meyer, and Warren T.
White
Machine Tool Practices, 7e
Copyright ©2002 by Pearson Education, Inc.
Upper Saddle River, New Jersey 07458
All rights reserved.
Large depth
of cut
To reduce cutting edge chipping
Increase the speed
Decrease the feed and/or depth of cut
Change to a tougher grade carbide
insert
Use a negative rake
Hone the cutting edge before use
Check the rigidity and tool overhang
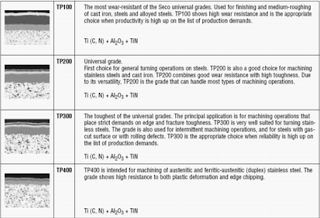
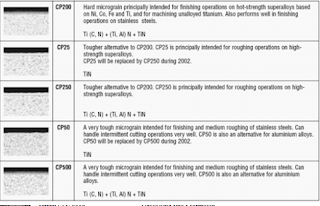
Select the cemented carbide grade
Select the cemented carbide grade
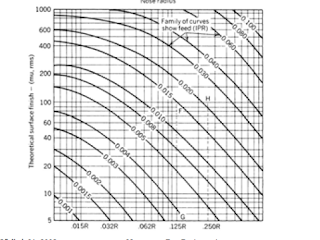
Select the nose radius
Based on surface finish
January 31, 2008 Nageswara Rao Posinasetti 21
FIGURE F-34 Surface finish versus nose radius
(copyright © General Electric Company).
Richard R. Kibbe, John E. Neely,
Roland O. Meyer, and Warren T.
White
Machine Tool Practices, 7e
Copyright ©2002 by Pearson Education, Inc.
Upper Saddle River, New Jersey 07458
All rights reserved.
8
Select the insert shape
Round – strong and large radius, good
for higher feed rates
Square – medium stronger
Traingular – least stronger, less
number of cutting edges, but more
versatile in use
January 31, 2008 Nageswara Rao Posinasetti 23
FIGURE F-35 Insert shapes for various
applications (Kennametal, Inc., Latrobe, PA)
FIGURE F-36 A 38-degree triangular insert used
for a tracing operation (copyright © General Electric
Company).
Richard R. Kibbe, John E. Neely,
Roland O. Meyer, and Warren T.
White
Machine Tool Practices, 7e
Copyright ©2002 by Pearson Education, Inc.
Upper Saddle River, New Jersey 07458
All rights reserved.
Select the insert size
Smallest size based on the depth of cut
used
Cutting edge should be 1.5 times that
of the length of cutting edge
engagement.
10
Select the insert thickness
Gives the strength of the tool
FIGURE F-37 Insert thickness as determined by length of
cutting edge engagement and feed rate (copyright © General
Electric Company).
Richard R. Kibbe, John E. Neely,
Roland O. Meyer, and Warren T.
White
Machine Tool Practices, 7e
Copyright ©2002 by Pearson Education, Inc.
Upper Saddle River, New Jersey 07458
All rights reserved.
January 31, 2008 Nageswara Rao Posinasetti 30
Select the tool style
Based on the geometry of the
operation to be performed.
11
January 31, 2008 Nageswara Rao Posinasetti 31
FIGURE F-38 Several of the many tool styles available
(Kennametal, Inc., Latrobe, PA).
Richard R. Kibbe, John E. Neely,
Roland O. Meyer, and Warren T.
White
Machine Tool Practices, 7e
Copyright ©2002 by Pearson Education, Inc.
Upper Saddle River, New Jersey 07458
All rights reserved.
Select the rake angle
January 31, 2008 Nageswara Rao Posinasetti 39
FIGURE F-39 Side view of back rake angles.
Richard R. Kibbe, John E. Neely,
Roland O. Meyer, and Warren T.
White
Machine Tool Practices, 7e
Copyright ©2002 by Pearson Education, Inc.
Upper Saddle River, New Jersey 07458
All rights reserved.
14
January 31, 2008 Nageswara Rao Posinasetti 40
Select the shank size
January 31, 2008 Nageswara Rao Posinasetti 41
FIGURE F-40 Determining shank size according to depth of
cut, feed rate, and tool overhang (copyright © General Electric
Company).
Richard R. Kibbe, John E. Neely,
Roland O. Meyer, and Warren T.
White
Machine Tool Practices, 7e
Copyright ©2002 by Pearson Education, Inc.
Upper Saddle River, New Jersey 07458
All rights reserved.
January 31, 2008 Nageswara Rao Posinasetti 42
FIGURE F-41 A boring bar with various
interchangeable adjustable heads (Kennametal, Inc.,
Latrobe, PA).
Richard R. Kibbe, John E. Neely,
Roland O. Meyer, and Warren T.
White
Machine Tool Practices, 7e
Copyright ©2002 by Pearson Education, Inc.
Upper Saddle River, New Jersey 07458
All rights reserved.
15
Select the chip breaker
FIGURE F-42 Chip breakers used are the adjustable chip deflator
(center) with a straight insert and the type with the built-in chip control
groove.
Richard R. Kibbe, John E. Neely,
Roland O. Meyer, and Warren T.
White
Machine Tool Practices, 7e
Copyright ©2002 by Pearson Education, Inc.
Upper Saddle River, New Jersey 07458
All rights reserved.
FIGURE F-43(b, c) (a) Negative rake two-sided Kenloc inserts; *Maximum
D.O.C. and feed rates (ipr) are limited by the insert thickness and cutting edge
length. Application ranges are for AISI 1045 steel at 180 to 220 BHN
(Kennametal, Inc., Latrobe, PA.)
Richard R. Kibbe, John E. Neely,
Roland O. Meyer, and Warren T.
White
Machine Tool Practices, 7e
Copyright ©2002 by Pearson Education, Inc.
Upper Saddle River, New Jersey 07458
All rights reserved.
16
Tool Holder Identification
January 31, 2008 Nageswara Rao Posinasetti 47
FIGURE F-44 ASA tool identification system (Tool Application
Handbook; data courtesy of Kennametal, Inc., Latrobe, PA,
1973.)
Richard R. Kibbe, John E. Neely,
Roland O. Meyer, and Warren T.
White
Machine Tool Practices, 7e
Copyright ©2002 by Pearson Education, Inc.
Upper Saddle River, New Jersey 07458
All rights reserved.
January 31, 2008 Nageswara Rao Posinasetti 48
Carbide Insert Identification
17
FIGURE F-45 ASA carbide insert identification (Tool Application
Handbook; data courtesy of Kennametal, Inc., Latrobe, PA, 1973.)
Richard R. Kibbe, John E. Neely,
Roland O. Meyer, and Warren T.
White
Machine Tool Practices, 7e
Copyright ©2002 by Pearson Education, Inc.
Upper Saddle River, New Jersey 07458
All rights reserved.4
Multiple-Point Cutting Tools
Drilling
Reaming
Milling
Gear cutting
Power requirement for Drilling
d = drill diameter, in
f = feed in/rev
Torque, M = 25,200 f 0.8 d1.8
Thrust, T =57,500 f 0.8 d 0.8 + 625 d 2
Power requirement for Reaming
T k f d
d1 = reamer diameter, in.
f = feed in/rev
January 31, 2008 Nageswara Rao Posinasetti 60
Power
Power in HP
M = tool torque, in-lb
N = speed, rpm
Power in Watts = Hp * 746
63,025
P M N c =
21
Machining Power
Depends on the material removal rate
Uses empirical equations developed
based on experiments
See Machinery’s Handbook
– pp 1046 – 1055 (26th Edition)
Pc = power at the cutting tool
Pm = power at the motor
Kp = power constant (see tab 24, 25 and 30)
Q = metal removal rate (tab 29)
January 31, 2008 Nageswara Rao Posinasetti 89
fm = feed rate, in/min or mm/min
f = feed rate for turning, in/rev or mm/rev
January 31, 2008 Nageswara Rao Posinasetti 90
Drilling
31
T = Thrust; lb or N
M = Torque; in-lb or N.m
N = Spindle rpm
32








0 comments